Table of contents
- Introduction
- Multi-user real-time collaboration: What is it, and why does it matter?
- Available options for multi-user real-time collaboration
- Yjs, a solution for multi-user real-time collaboration
- How to set up a React app with Yjs
- How to set up a React Flow app with Yjs
- The architectural challenges of multi-user real-time collaboration apps
- Communication model of Yjs
- Scaling Yjs WebSocket servers
- Organizing and persisting datain Yjs
- Thinking in Yjs vs. client-server thinking
- Conflict resolution in Yjs CRDT
- Yjs integration into an existing system
- Multi-document approach
- Using Yjs with front-end frameworks
- Summary: Considering everything—is Yjs even right for me?
- It’s a wrap!

Introduction
Adding multi-user real-time collaboration to React Flow diagrams sounds
like a great feature. It's complex, not so straightforward, but entirely possible. The real question is—how do we make it work? How to implement it into
your software project seamlessly? Are there off-the-shelf solutions, or will
we need to build from scratch? And what exactly do we need?
Multi-user real-time collaboration is a full-stack topic. It isn’t just about the front-end. For a smooth collaborative diagramming experience, we need
to look at things from all angles—front-end (React, React Flow), back-end, and even the underlying architecture. In this post, we’ll explore the options, the challenges, and how to overcome them.
Multi-user real-time collaboration: What is it, and why does it matter?
When building rich client applications, sooner or later we must face the topic of concurrency. Users will need to share resources, view each other’s content, and sometimes even edit it—sounds like standard app behavior, right? However, it adds complexity. Allowing multi-user editing of the same document at the same time can lead to conflicts. While simple solutions like read-only modes or check-in/check-out mechanisms can help, they aren’t exactly the smooth, collaborative experiences users expect today. With
apps like Google Docs or Miro setting the bar for real-time collaboration,
multi-user editing is demanded wherever you look—with changes reflected live, seamlessly, and without friction.
This is where multi-user real-time collaboration comes in: it’s about techniques that allow multiple users to interact with the same document
in real time, avoiding any possible conflicts. No matter if we’re dealing
with a drawing canvas or a text document, the fundamental techniques
for introducing multi-user editing are the same, but they’re different from
the typical client-server model. Sounds confusing? I know.
But don’t worry—we’ll break it all down for you.
A quick note: While this article focuses on React Flow, as collaborative diagramming and data visualization are our main areas of expertise
at Synergy Codes, the insights we discuss here are broadly applicable
to all types of multi-user real-time collaboration apps. That said, diagramming introduces unique challenges not typically found
in text-based applications, and text editors come with their own set
of issues.
Available options for multi-user real-time collaboration
When it comes to adding multi-user real-time collaboration, you have the following options to consider:
Writing your own custom solution
Using libraries for multi-user real-time collaboration
Leveraging services for live synchronization
Building a custom solution might be tempting for developers who love a good challenge, but I’d strongly advise against it. The complexities of multi-user real-time collaboration are often underestimated. Without a solid understanding of concurrent and distributed systems, you’re likely to run
into issues that are already well-understood and easily solved by existing solutions.
So, we're left with two options for adding multi-user real-time collaboration into your software.
Libraries are the most flexible solution since they can be integrated into almost any project. Most of them are implementations of CRDT (Conflict-free Replicated Data Type), which is a data structure designed specifically
for distributed data systems and multi-user real-time collaboration. If you're really curious about CRDTs, there's a wealth of research on the topic, and
the CRDT.tech website is a great place to start.
What libraries are available? Some of the more well-known ones include Yjs, Loro, Automerge, Logux, TinyBase. Keep in mind, though, that not all libraries will include communication protocols out of the box—they may just focus
on conflict resolution through CRDTs. Before using them, dig into the documentation and read this article until the end.
On the other hand, services might come with more limitations, but using them is more straightforward. Some of them may even be easily integrated into your existing tech stack. Just to name a few: Liveblocks, Superviz, Electric, Supabase Realtime. Even if you decide to use a cloud service,
it’s still worth reading through this article—since you may run into development and architectural issues that we describe here. Plus, some services actually rely on the same libraries mentioned earlier,
so understanding the underlying technologies can still be helpful.
Yjs, a solution for multi-user real-time collaboration
At Synergy Codes, we strongly recommend Yjs for multi-user real-time collaboration. It’s a free, open-source, MIT-licensed JavaScript library implementing Yjs CRDT that can be used both on the client and server side.
One of the key advantages of Yjs is its flexibility—it doesn’t restrict you
to specific use cases, giving you the freedom to adapt it to various projects. This flexibility ensures that Yjs can be used in everything from multi-user text editing to complex collaborative diagramming. Yjs is also lightweight, battle-tested, and ready for production use. Additionally, Yjs awareness allows real-time updates on who is currently interacting with your project. At Synergy Codes, we’ve successfully developed multi-user real-time collaboration apps with Yjs from scratch, as well as integrated it seamlessly into existing apps.If you’re curious about our Yjs expertise or want to try it out yourself, check out our demo app.
While this article will now focus on using Yjs, the concepts and challenges we’ll discuss are present in other CRDT implementations, or even more broadly, in other multi-user real-time collaboration apps.
How to set up a React app with Yjs
Before diving deep into how Yjs works and how to integrate it with your app, let’s start with a hands-on example. We’ll build a simple React app using Yjs for state management to enable multi-user real-time collaboration. Once we get the basics down, we’ll transition to React Flow, but let’s first lay the foundation with something straightforward using multi-user real-time collaboration principles.
Initial app without multi-user real-time collaboration
I won’t walk you through the process of setting up a React project—you’re free to use whatever method you prefer (but I’d recommend steering clear
of Create React App, since it’s deprecated). For this example, I’ve built a very simple to-do list app.
The key file here is use-todo.ts, as it contains the whole app's logic. By taking a look at the code, you’ll notice the state is made up of three variables:
todoItems – to-do items kept as a map: id -> TodoItem data.
order – map defining the order of items: id -> order.
currentEditedItem – points to the item that is being edited at the moment: keeps id or null. Used to display the editor for the proper entry.
Using a map for to-do items and defining order separately may seem unconventional for a typical to-do app, where items are often stored in arrays. However, this structure will make it much easier to adapt the code for Yjs, and it mirrors the kind of setup you might encounter in real use cases, such as collaborative diagramming apps.
The rest of the code isn’t crucial to this tutorial, as we’ll be focusing primarily on enabling multi-user real-time collaboration by modifying the app’s logic.
Adding Yjs to the app
Prerequisites
Before we integrate Yjs into our app, we need to install two packages:
yjs – The core Yjs package that provides collaborative state management.
y-websocket – A library that adds WebSocket connectivity for Yjs. It also comes with a simple Yjs WebSocket server that we’ll use.
Once the packages are installed, let's add a new entry to package.json for running a local Yjs WebSocket server with persisting data on a disk:
1"ws-server": "PORT=1234 YPERSISTENCE=./dbDir node ./node_modules/y-websocket/bin/server.cjs"
Now that we’ve added the Yjs WebSocket server, we can start it and let it run in the background with: npm run ws-server.
Yjs front-end setup
Now, let's revisit the use-todo.ts file. We need to start with two steps:
Initialize state management with Yjs.
Initialize Yjs WebSocket connection.
Unlike state management libraries like Redux, that keep everything in a store, Yjs keeps its data in a document, initialized using new Y.Doc().
Y.Doc itself can store only special data structures called shared data types. While they might remind you of Redux slices, they work differently. These data structures not only define how data is organized but also handle conflict resolution. There are six of them available and they cover all popular
use cases:
Y.Map – Keeps data as a key-value storage.
- If your app heavily relies on maps, you may want to check out YKeyValue which works the same but provides better optimization.
Y.Array – Keeps data as an array list.
Y.Text – Data structure optimized for text and rich text.
Y.XmlFragment, Y.XmlElement, Y.XmlText – Structures enabling multi-user real-time collaboration on XML-structured data.
Since our to-do app relies primarily on maps, we’ll use Y.Map. To create
a new map in Y.Doc (or get an existing one), we use the doc.getMap() function. So, let's create the document with proper maps (we only need
to synchronize todoItems and order, as currentEditedItem doesn't need
to be synchronized):
1import * as Y from 'yjs';
2
3const doc = new Y.Doc();
4const itemsMap = doc.getMap<TodoItem>('todoItems');
5const orderMap = doc.getMap<number>('order');
However, creating Y.Doc itself only gives us state management. We still
need connectivity between users. We’ll add it by instantiating the WebSocketProvider with the address of our Yjs WebSocket server:
1import { WebsocketProvider } from 'y-websocket';
2
3const wsProvider = new WebsocketProvider('ws://localhost:1234', 'todo', doc);
4wsProvider.on('status', console.log);
The last line adds a simple logging mechanism, so we can track
the connection status.
Notice that we define all of these outside of the React hook. That's because Yjs isn't a React solution and if not needed, we shouldn't keep it in React's lifecycle.
Synchronizing Yjs state to local state
Since Yjs isn't a React library, we need to write our own bindings. This involves handling two cases—reacting to changes in Yjs and sending changes to Yjs. Let's focus on the first one.
Each shared type implements an observer pattern by providing an observe function (along with unobserve). This allows us to define a callback that triggers whenever the data changes. To make things simple, we can tap into the existing useState. State can be easily accessed by converting the shared type with the toJSON() function. In the case of Y.Map, it will return
a plain JavaScript object.
As it has to be done before rendering anything, we should create
a useEffect without a dependency array for registering observers:
1const [todoItems, setTodoItems] = useState<Record<string, TodoItem>>({});
2const [order, setOrder] = useState<Record<string, number>>({});
3
4useEffect(() => {
5 const itemsObserver = () => {
6 setTodoItems(itemsMap.toJSON());
7 };
8 const orderObserver = () => {
9 setOrder(orderMap.toJSON());
10 };
11 itemsObserver();
12 orderObserver();
13
14 itemsMap.observe(itemsObserver);
15 orderMap.observe(orderObserver);
16
17 return () => {
18 itemsMap.unobserve(itemsObserver);
19 orderMap.unobserve(orderObserver);
20 };
21}, []);
You might have noticed that we invoked functions despite setting them to observe. That's because they only trigger when Yjs gets new data, and we'd rather have an initial state. You also need to remember about unobserving in the effect's destructor to prevent memory leaks.
Synchronizing local changes to Yjs
At this point, our local state is in sync with what's happening in Yjs. However, when a user interacts with the to-do list, they're not just modifying Yjs—they're also updating the local state. Let's break down how we handle this with two examples.
Y.Map has a set (key, value) function. As expected, this function sets a value to a given key. Since our example relies solely on maps, that's the only thing that we’ll need to use.
First, let's check the addNew function, which adds a new to-do item
to the state. Currently, it recreates objects in the state with an added
new key-value pair:
1const addNew = useCallback(() => {
2  const item: TodoItem = {
3    id: crypto.randomUUID(),
4    title: '',
5    description: '',
6  };
7  setTodoItems((x) => ({
8    ...x,
9    [item.id]: item,
10  }));
11  setOrder((x) => ({
12    ...x,
13    [item.id]: sortedTodoItems.length,
14  }));
15  setCurrentEditedItem(item.id);
16}, [sortedTodoItems]);
In Yjs, there's no need to create a new map—we can simply set the new value. This way, the code gets simplified to:
1const addNew = useCallback(() => {
2  const item: TodoItem = {
3    id: crypto.randomUUID(),
4    title: '',
5    description: '',
6  };
7  itemsMap.set(item.id, item);
8  orderMap.set(item.id, sortedTodoItems.length);
9  setCurrentEditedItem(item.id);
10}, [sortedTodoItems]);
Another scenario involves updating a specific value in an object. Since our to-do items are JavaScript objects, we can independently set the title and description. For example, updating the title currently looks like this:
1const updateTitle = useCallback((id: string, title: string) => {
2  setTodoItems((x) => ({
3    ...x,
4    [id]: {
5      ...x[id],
6      title,
7    },
8  }));
9}, []);
In Yjs, we'll do it this way:
1const updateTitle = useCallback((id: string, title: string) => {
2  itemsMap.set(id, {
3    ...itemsMap.get(id)!,
4    title,
5  });
6}, []);
As you can see, we're recreating the object within the key-value pair. That's done so that Yjs is aware that there was a value change. It's awareof changes only on the level of shared types, but not deeper in them.
Following this same approach, you can update other functions as well, such as modifying the description or reordering items in the list.
Yjs awareness
In addition to shared types, Yjs providers use another mechanism for sharing changes: Yjs Awareness.
Yjs Awareness is used to share user state between all connected clients. By user state, we mean data that shouldn't be subject to conflict resolution, can only be edited by a single client at a time, and everyone should be aware of. A common example is cursor position, but Yjs Awareness can also be used in other situations.
Since Yjs Awareness is a part of the Yjs provider, we can find it in our WebsocketProvider, not in Y.Doc:
1const awareness = wsProvider.awareness;
So, what can we do with it in our to-do app? For example, we have a local state that tracks what the user is editing. Why not share this information
so all clients can see what each user is working on? This can be easily done in the following way:
1const [editedBy, setEditedBy] = useState<Record<string, number>>({});
2
3useEffect(() => {
4 const awarenessObserver = () => {
5 const result: Record<string, number> = {};
6 awareness.getStates().forEach((val, key) => {
7 if (val.edited && key !== awareness.clientID) {
8 result[val.edited] = key;
9 }
10 });
11 setEditedBy(result);
12 };
13 awarenessObserver();
14 awareness.on('change', awarenessObserver);
15
16 return () => {
17 awareness.off('change', awarenessObserver);
18 };
19}, []);
20
21// example of setting the Awareness:
22const handleItemEdit = useCallback((id: string) => {
23 setCurrentEditedItem(id);
24 awareness.setLocalStateField('edited', id);
25}, []);
As you can see, Yjs Awareness also implements the observer pattern, but
the usage is a bit different than Y.Map. Instead of using observe(), we add
an event listener with on(). In the observer, we iterate over each Yjs Awareness entry and copy them to our local state—excluding our own entry by checking the client ID.
Yjs Awareness itself is also a map, where client IDs are the keys, and the associated values can be anything. Now, it’s up to you to leverage this information in the UI. For example, you could highlight or change the color of the to-do item currently being edited by another user.
Summary of changes: Adding multi-user real-time collaboration
Adding multi-user real-time collaboration to our to-do app wasn't a hard task. We kept most of the original code intact and simply added some extra things to ensure integration with Yjs.
You can find the complete example here:
https://github.com/synergycodes/yjs-example-react-todo-app.
If you prefer, you can view only the diff of changes here: https://github.com/synergycodes/yjs-example-react-todo-app/compare/initial-app...main.
Here’s a quick rundown of what we did:
Added Yjs to the project.
Set up the Yjs WebSocket server and Yjs WebSocket provider.
Created maps in Yjs for keeping items and order: itemsMap and orderMap.
Added useEffect hooks with observers:
- For itemsMap and orderMap copying their data to local state.
- For Yjs Awareness to synchronize who's editing what.
Modified callbacks to use Yjs instead of local state: addNew, handleItemEdit (only Yjs Awareness), updateTitle, updateDescription, handleDragEnd (reordering).
To show Yjs Awareness data in the UI, we've added coloring of to-do items based on the user ID.
Remember, the to-do app is one of the simplest types of apps, so adding multi-user real-time collaboration to it wasn’t particularly challenging. As app complexity increases, so will the complexity of working with Yjs. However, these basic steps are the foundation you’ll work with most often when implementing multi-user real-time collaboration.
How to set up a React Flow app with Yjs
While to-do list apps are nice and simple, many of us don’t spend our professional lives working on them. Instead, we often dive into more complex projects. Let's explore how you can integrate Yjs with React Flow to build collaborative diagramming apps.
High-level overview before building a collaborative diagramming app
The basics remain the same: You’ll need Yjs, a connection provider,
and Y.Doc. What differs is the content and usage.
Here's a high-level overview of what needs to be done:
We need to instantiate Yjs connection provider and Y.Doc.
Inside Y.Doc we need to keep two Y.Map instances (or YKeyValue)—one for the nodes and the other for the edges.
We need to write a React code to synchronize the Yjs state with ReactFlow.
- It's very similar to using ReactFlow with Zustand.
- We need to have:
a. Reactive nodes and edges state variables (as arrays).
b. onNodesChange and onEdgesChange functions to synchronize ReactFlow changes with the state.
Additionally, you may want to synchronize cursor positions via Yjs Awareness, but for now, let's focus on getting the basics set up.
Synchronizing Yjs with React Flow when building a collaborative diagramming app
In React Flow, we operate on two important arrays in the state: nodes and edges, which together represent the entire graph. However, in Yjs, we won't keep it this way. Instead, a better structure for Yjs is a key-value map, as it allows for precise edits—a crucial factor for conflict resolution. Fortunately, our nodes and edges already have unique IDs, so there’s nothing stopping us from doing it this way.
1const ydoc = new Y.Doc();
2export const nodesMap = ydoc.getMap<Node>('nodes');
3export const edgesMap = ydoc.getMap<Edge>('edges');
Observing both structures is straightforward and works the same way
as in our to-do list example. Things get interesting in updating Yjs, because React Flow requires us to implement onNodesChange and onEdgesChange functions. These functions send specific changes along with their type, which is great for targeted updates but also introduces some complexity.
For example, when writing onEdgesChange, we could write a code like this
to handle different changes in Yjs:
1// note that we're in the context of React, so this code should be either in a Component or a Hook.
2
3// local state variable that will be used by ReactFlow
4// remember to not use `setEdges` in other places than Yjs synchronization!
5const [edges, setEdges] = useState<Edge[]>([]);
6
7/**
8 * listening to Yjs changes and copying them to a local state
9 */
10useEffect(() => {
11 const observer = () => {
12 setEdges(Array.from(edgesMap.values()));
13 };
14
15 // remember to execute observer, to have initial state synchronized
16 observer();
17 edgesMap.observe(observer);
18
19 return () => {
20 edgesMap.unobserve(observer);
21 }
22}, []);
23
24const onEdgesChange: OnEdgesChange = useCallback((changes) => {
25 const edges = Array.from(edgesMap.values());
26 // let ReactFlow do changes on it's own in case we can't interpret change easily
27 const nextEdges = applyEdgeChanges(changes, edges);
28 // let's iterate over all changes and decide what to do with them
29 for (const change of changes) {
30 if (change.type === 'add' || change.type === 'replace') {
31 // adding or replacing is effectively the same operation in Yjs
32 // so we just set a new value in `edgesMap`
33 edgesMap.set(change.item.id, change.item);
34 } else if (change.type === 'remove' && edgesMap.has(change.id)) {
35 // removing is also straightforward
36 edgesMap.delete(change.id);
37 } else {
38 // in other cases let's rely on what has been done by `applyEdgeChanges` and copy it to Yjs
39 edgesMap.set(change.id, nextEdges.find((n) => n.id === change.id)!);
40 }
41 }
42}, []);
The first case handles adding or replacing the edge, which
is a straightforward use of the set() function. The second case deals
with removing the edge.
Of course, this sample code isn’t a complete solution—there’s still more work to do. You’ll need to handle node changes, and it would be nice to have user cursors as well.
Thankfully, with what we’ve covered so far, implementing these features should be straightforward. However, if you’re looking for a full working demo, React Flow Pro comes with an example of using React Flow with Yjs.
React Flow Pro example for collaborative diagramming
The React Flow Pro example is a great starting point for building multi-user real-time collaboration apps with React Flow and Yjs. While it’s a solid foundation for collaborative diagramming, there are areas where things could be optimized or handled differently.
Here’s how our approach differs:
We keep cursor states in Yjs Awareness instead of Y.Map.
We don't share fields like selected or dragging via Yjs.
- The React Flow Pro example shares the whole state, but we prefer not to have all users share the same selection.
- Instead, we use Yjs Awareness to indicate when another user has selected a node.
- Some implementation details:
a. We keep non-synchronized values in a local state.
b. In onNodesChange and onEdgesChange, we separate which changes should be stored in Yjs and which should remain local.
c. When synchronizing Yjs state with React Flow, we merge local values.
d. Local state (or relevant parts of it) is sent separately via Yjs Awareness.
Consider these differences when moving the code into your own app. It's also worth noting that Yjs includes built-in undo/redo functionality, which is not a part of this implementation—but could be a valuable addition.
The architectural challenges of multi-user real-time collaboration apps
From the example we just explored, Yjs might seem like just another state management library. Aside from running an additional server, there were no major changes to the technical stack. That’s the beauty of Yjs: it’s that simple! But bear in mind that this was a very basic use case—in real-world applications, things get more complex.
When working with Yjs—or multi-user real-time collaboration apps, in general—we typically face three implementation scenarios:
New projects – When starting from scratch, we can design the entire software project properly with multi-user real-time collaboration in mind. This gives us full control, but it also requires a deep understanding of Yjs’ capabilities and limitations.
Adding a multi-user editor to an existing app – Adding a new part to an existing software project means working within an established architecture. This introduces integration challenges, requiring careful planning to ensure compatibility of the multi-user editor with the rest of the system.
Adding multi-user real-time collaboration to an existing editor – The most complex scenario is adding multi-user real-time collaboration to an existing editor. Here, we must ensure that Yjs doesn’t interfere with established functionality. Simply swapping out existing state management or saving function for Yjs’ synchronization won’t work in most cases.
Yjs operates differently from typical client-server or request-response solutions. To use Yjs effectively, we need to understand it on multiple levels. Let me guide you through the most common problems we've encountered and how to tackle them.
Communication model of Yjs
Distributed computing architectures
When working with apps that have a backend, we’re dealing with
distributed computing. While we often associate "distributed systems" with massive infrastructures like Facebook’s multi-data-center setup, even having a separate client and server qualifies.
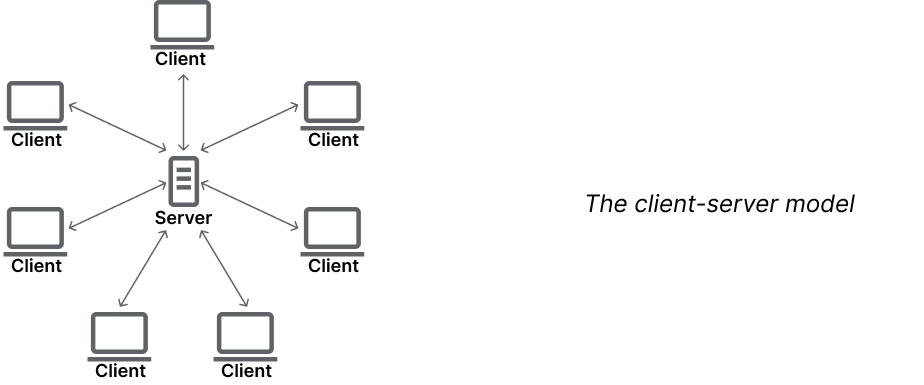
In distributed computing, two key architectures define the communication model:
Client-server – Client apps communicate with a server to fetch or save data. The server acts as the authority, managing data, access roles, and permissions. Clients depend on the server to function, making it the backbone of the system.
Peer-to-peer (Client-Client) – Client apps contact each other directly to share data. There's no central unit; every participant is both a client and a server. This model enables full data transparency—every user has read/write access to the same data.
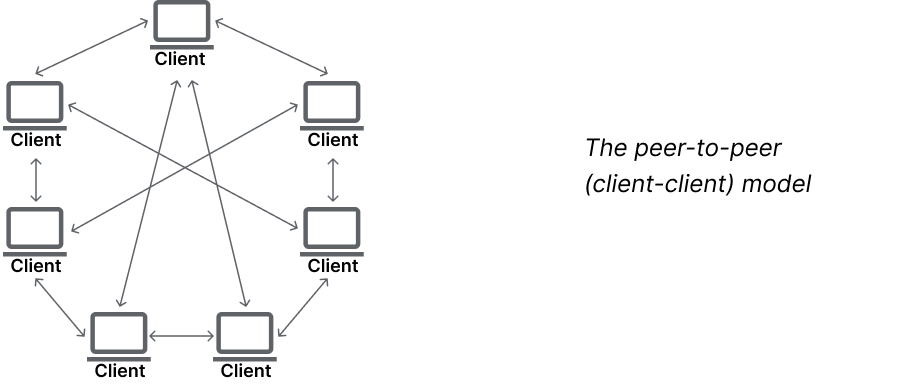
As you might expect, the client-server model is the most common in modern applications. Multiple users connect to the backend to store and retrieve data. But how does Yjs fit into this picture? Can it work within a client-server setup? Let’s dive deeper.
Communication in Yjs
Yjs itself doesn't provide communication protocols. On its own, Yjs functions as a state management solution. To enable communication between clients, you need to use Yjs providers. The key point to understand here is that, no matter which protocol these providers use, Yjs enforces a specific communication model internally. For example, in our earlier scenario, we used Y-websocket, one of the official providers to enable communication.
The Yjs communication model implies that all clients should have synchronized, identical states. Communication protocols only exchange the changes that have occurred. All computations are done locally on client machines. In practice, this means we should consider Yjs as a peer-to-peer solution, regardless of the communication protocol being used. Even if there is a central server that all clients connect to, if it uses Yjs, it behaves just like any other client.
Yjs tries to make state copies across all clients equal by sending changes as they happen and synchronizing the clocks. By "clocks," we don’t mean real-world wall clocks. Instead, Yjs uses Lamport timestamps, which are logical clocks that track how many operations have been performed. In distributed systems, relying on real-world clocks can be tricky since, in most cases, we can’t guarantee proper synchronization.
So, how is it possible for all computations to happen on the client-side and for all clients to have the same state? It all comes down to the CRDT magic and its deterministic nature. As long as the data is the same, it will always compute the same state. Even if a client goes offline for a while, when it reconnects, it will receive all the changes and merge them without losing its work if it doesn't interfere with what has already been done. This is possible because everyone gets information about all the changes. This means we mustn't interfere with how and what data is synchronized.Integrating Yjs into a distributed system
As mentioned earlier, Yjs itself doesn’t implement any communication protocols—it relies on providers. This means that we can have both peer-to-peer and client-server connectivity (though, the server still acts as a client).
Client-server
In a client-server setup, there’s a central server to which every client connects. The server holds its own Yjs state, synchronized with the data sent by the clients, and propagates all these changes. This kind of architecture gives us full control over communication. For example:
We can add authorization.
We have full control over what is persisted into the database, as the server should always have the ultimate copy of the state.
We can also prepopulate Yjs' documents with existing data.
Since each client connects to a single server, the performance on the client side isn't determined by the number of users editing the same document simultaneously. However, having a central server in the architecture means that it has to be performant, and that over time we will need to scale—something we'll dive into later.
What about protocols? WebSockets are the industry standard for real-time synchronization and are the most popular and recommended option for Yjs. However, thanks to how Yjs works, theoretically, we should be able to use other techniques that enable real-time client-server communication, including older HTTP solutions like short-polling or long-polling.Peer-to-peer
Since Yjs works in a peer-to-peer manner, this means that we can use peer-to-peer communication protocols in real-time collaboration apps, which even sounds more natural. Yjs has official providers for WebRTC (y-webrtc) and DAT (y-dat) protocols, but others are possible too.
In this setup, Yjs providers connect clients with each other, and no single client takes on the role of a central server. While this offers a more decentralized approach, it also means we don't have the same degree of control as with client-server implementations. Performance on the client side may be negatively affected, especially when many users are editing the same document at the same time.
Peer-to-peer doesn’t mean no server at all. You'll actually need one—a signaling server, so clients know with whom they can connect. Additionally, you’ll need to think about how to handle document persistence, since all users are equal. In some cases, you might still need one client with a bit more power in the system.
While peer-to-peer connectivity removes the complexity regarding server scaling, it brings its own set of challenges—especially when developing production-grade multi-user real-time collaboration apps. While we like the idea of delegating connectivity to users and keeping everything peer-to-peer, we typically recommend the client-server model for most applications, including those focused on collaborative diagramming.Yjs via WebSocket
For production, using Yjs with WebSocket providers is the most common mix in multi-user real-time collaboration software. Let’s take a look at some of the top options available:
y-websocket – A simple, barebone solution provided by the Yjs developers. I wouldn’t recommend using it directly in production due to its simplicity, but it can work as a base for custom production-grade providers. At Synergy Codes, we have experience modifying y-websocket to integrate it into larger systems, including real-time collaboration projects, but due to the extra work needed, we typically prefer exploring other options first.
Hocuspocus – A production-grade Yjs provider developed by the authors of the TipTap text editor. It's highly extensible, allowing you to tap into the entire connection lifecycle with hooks, and it comes with ready-made extensions for popular use cases, such as data persistence in various databases. We recommend it as a go-to solution for a Yjs server.
Y-Sweet – Very performant (written in Rust), but it doesn't offer much freedom for customization. That said, it’s still a solid production-grade solution for multi-user real-time collaboration software, and what sets it apart is its great debugger that makes working with Yjs much easier.
There are other options available, both self-hosted and cloud-based, but after working with these three, we feel confident in recommending them for most use cases.
Scaling Yjs WebSocket servers
Let’s assume we’ve decided to use Yjs with one of the WebSocket providers. As we scale our application for production, we need to plan ahead, knowing that at some point, we may need to increase computational power to handle the load. Scaling can be complex, and when it comes to multi-user real-time collaboration, there are additional challenges that traditional architectures don’t face.
Basics of scaling
When talking about scaling, we typically have two methods in mind:
Vertical scaling – Increasing the memory and computational power of a single machine (server).
Horizontal scaling – Increasing the number of machines (servers).
While vertical scaling is relatively straightforward, we’ll focus here
on horizontal scaling.
In traditional architectures, horizontal scaling is simple because HTTP
is stateless by design. This means we can run multiple instances of the same service, and no matter which server a client connects to, they should always receive the same data.
However, when multiple users are editing the same document at the same time, they can’t be freely assigned to any server, because this could lead
to conflicts. As I mentioned earlier, Yjs works when all clients have the identical set of changes, so Yjs CRDT can equalize client states. This means we have to approach scaling a Yjs WebSocket server differently.
Do you need to scale Yjs?
Before diving into scaling, it’s important to ask yourself: Do you actually need to scale Yjs?
Yjs, according to its author, is highly performant. Benchmarks, such as those from crdt-benchmark, show that Yjs performs a lot of operations quickly
on a mid-range consumer-grade machine. It doesn’t consume a lot
of memory either. As highlighted in the linked blog post discussing CRDTs
for multi-user editing:
"At 30 characters per minute, a human would need 1.65 years of non-stop writing to produce 26 million operations. (…) Yjs comfortably handles 26 million changes using only 220 MB of memory."
This is true for text editors. However, when it comes to more advanced
multi-user real-time collaboration apps that synchronize more data—like collaborative diagramming apps—memory can be consumed much faster. That's because Yjs retains the entire document history to track changes properly. And let’s not forget that real-world apps allow multi-user editing, further impacting memory usage.
What we recommend is starting with a single Yjs WebSocket server
and monitoring its usage. If it starts consuming too many resources, then
it might be time to think about scaling. I’ll cover two techniques, both
of which don’t require significant changes to the front-end or the Yjs WebSocket server itself. However, keep in mind that these techniques
may pose different infrastructure challenges.
Approach #1: Session Backends
The first approach worth noting is called Session Backends.
Here, we assume that each document is always hosted on a single server. All users editing that document (multi-user editing) will connect to the same server. While there’s no limit to how many documents can be edited on one server, the most common approach for multi-user real-time collaboration software is to assign one server per document—hence the name "Session Backends."
To make it work properly, we need an additional server that orchestrates everything. Here’s how it functions:
Checks if the requested document is currently being edited.
If it isn't, it creates a new Yjs WebSocket server.
Then it provides the user with the address of the Yjs WebSocket server to connect to.
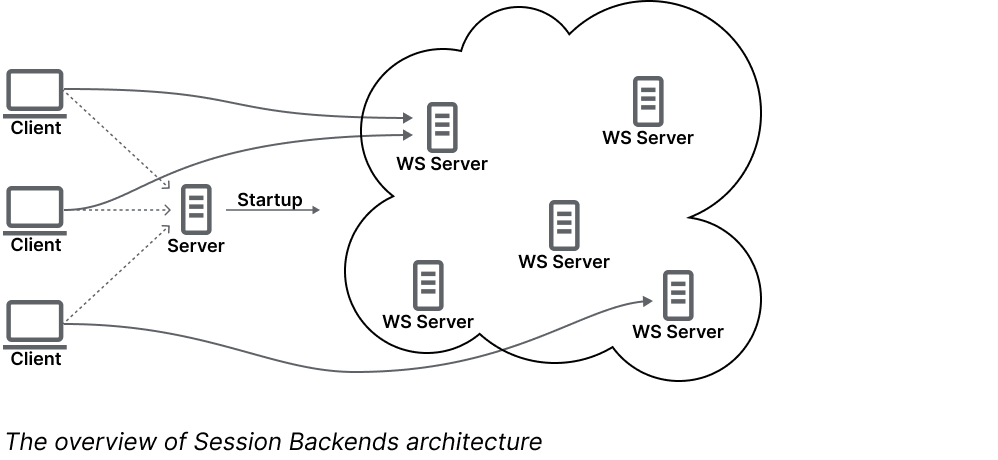
If you want to self-host, try using Plane. Alternatively, if you prefer a cloud service, JamSocket offers the same functionality —it's Plane as a service. The best part? On the Yjs WebSocket server side, you don’t need to write any additional code to make it work. You’ll only need to add some extra front-end code.
Approach #2: Redis-based
Another popular approach for scaling Yjs WebSocket servers is to use
a common interface for synchronizing data between them—Redis is most commonly used for this purpose.
In this approach, we don't need to treat Yjs WebSocket servers as different entities from usual HTTP servers. They can be multiplied and load-balanced the same way. It doesn't matter which server a client connects to. However, to make it work, we need a way for all the servers to communicate with
each other, and maintain a consistent Yjs state. That's where Redis comes into play.
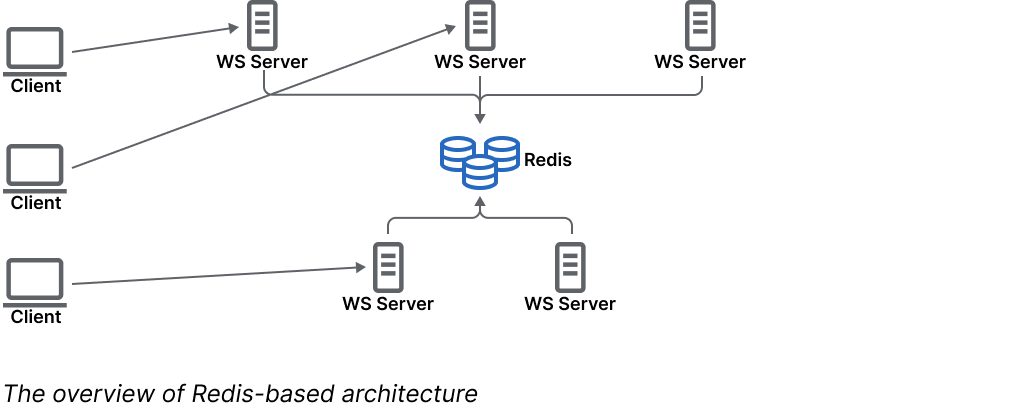
Redis is a fast in-memory database solution that has become an industry standard for caches, key-value storage, and even for simple message queues. It’s used as a persistence layer to transmit Yjs changes between servers as if they were connected to each other directly. Of course, we could connect them directly, as Yjs works in a peer-to-peer manner, but we should assume that servers don't know about each other—hence the additional layer for communication between servers.
The good news is this approach doesn't require a lot of additional setup,
and can easily be integrated with real-time collaboration systems.
All we need is a Redis instance that all the servers can connect to.
And since the communication happens entirely on the server side,
no changes are necessary on the front-end side. Fortunately, Hocuspocus provides a built-in solution for Redis-based synchronization, and it’s very simple to configure.
Comparison of approaches
Let’s compare both approaches so you can decide which one best fits your needs.
Infrastructure configuration
- Session backends require a separate, dedicated infrastructure. However, if your app is cloud-first, and you don’t mind using an additional provider, or you’re working on a new project, this approach might be a good option.
- If you already have an established infrastructure—especially one with load balancing in place—then the Redis-based approach might be a better fit as it only requires adding a Redis instance.
- The choice here depends on how much flexibility you have to modify your existing architecture and which approach better aligns with your needs in the long run, considering other advantages and disadvantages.
Let’s compare both approaches so you can decide which one best fits your needs.
Resource usage
- In the Session Backends approach, there's always one server per document, meaning all computations happen on that single server. This can help save resources in a real-time collaboration scenario, but keep in mind that spinning up a new server also consumes some resources.
- Because Yjs performs every computation on every client, it means that with the Redis-based approach, we will need to repeat all computations on each server. However, the number of connections is minimized to one server. Because each server can serve multiple documents, it may lead to high resource usage in corner cases.
- Here, you need to leverage how your app is used. If your app deals with multiple large documents, Session Backends may be the better option. However, if you’re working with smaller documents and don’t need a dedicated backend for each one, Redis-based synchronization should be sufficient.
Geo load balancing
- Session Backends have a limitation when it comes to load balancing based on user location. Even if you deploy servers across different cloud regions, it will always be tied to the first user who connects. For example, if a user in the U.S. starts editing, users from Europe will be connected to that same U.S. server. That's because of the restriction that one document can be edited only on one server.
- Redis-based scaling is better in this case because multiple servers can handle a single document, meaning that clients in the U.S. connect to a Yjs WebSocket server in their region, and European clients connect to a Yjs WebSocket server in Europe. Of course, there may still be some delay due to server-to-server synchronization, but the biggest factor affecting user experience is the client-server delay, not server-to-server communication.
- If geo load balancing is a priority, the Redis-based approach is the only option that fully supports it. But it’s worth considering whether this is a critical need for your application.
Which approach is the best? There’s no one-size-fits-all answer. Both Session Backends and Redis-based scaling have their strengths and trade-offs. I encourage you to read more about both options and decide what's best for your needs.
Organizing and persisting datain Yjs
When building a multi-user real-time collaboration app with Yjs, another thing to consider is how to organize and persist data.
Why is this a challenge?
As we’ ve seen in a live example, Yjs keeps data in a structure called Y.Doc.That's t he place where we store more specialized structures like Y.Text, Y.Array, or Y.Map, or on which Yjs CRDT is performed.
The challenge, however, is that the data in Yjs doesn't need to represent
the whole data model that needs to be persisted in a multi-user real-time collaboration. It doesn't need to be the same business or logical model
as other APIs in the system. In fact, it even shouldn't have the complete dataset. Yjs should only store data that's affected by multi-user real-time collaboration and can be accessed by every collaborating part.
It's worth noting because the Yjs WebSocket server, despite being
a backend, doesn't necessarily need to be a full backend service—nor should it be for real-time collaboration software. Instead, think of it as
a microservice whose only job is to facilitate data exchange in a multi-user collaborative environment. This is especially important when implementing scaling methods like Session Backends, where keeping the server lean
and minimal is a priority. But if the server is so minimal, where should
we store Yjs data to ensure system-wide data consistency?
So, we've just covered organizing data, but that’s not all—the data itself presents another challenge. Yjs organizes data in a series of structs, which differs from how data is typically stored or accessed. Additionally, all state updates in Yjs are binary encoded. While this isn’t necessarily a problem,
it does mean that you need Yjs itself to decode and merge updates into
the rest of the doc. This raises an important question: what data should
be stored outside Yjs?
Furthermore, multi-user real-time collaboration generates lots of changes, and there isn't exactly something like a save button. This leads to another crucial question: how often should we store data outside of Yjs?
Where to store?
Now that we’ve tackled the basic challenges, let’s move on to the next big question: where to store? Honestly, the options are fairly straightforward, and the choice depends on what kind of data you decide to store.
The first option is to store data directly in a database of your choice. Hocuspocus provides an extension that allows you to store and fetch data from any database. You simply configure two functions: one for storing
the data, and one for retrieving the data. This flexibility means you can
use any DB driver you like. If you prefer SQLite, Hocuspocus even
offers a dedicated extension for it.
Another option is file storage, such as S3. This is the only persistence method available in Y-Sweet, but it’s also possible with Hocuspocus using
the same database extension (after all, it's just another database).
S3 can be an attractive option because Yjs data is, by default, binary encoded into a single blob, so file storage seems more natural. Running
cost calculations beforehand is a good idea to determine the best fit
for your needs.
The last option is to use another backend for persistence. When working
with Hocuspocus, the database extension doesn’t actually require you to use a traditional database—you can store data via any API instead. From
a technical perspective, storing data via an API is no different from storing
it in a database (since databases are typically accessed through APIs anyway). However, from a logical and business standpoint, there
is a difference. If you go this route, Hocuspocus provides another useful feature: webhook extension, allowing you to configure webhooks instead
of API calls in the database extension.
What to store?
Time to jump into the topic of what the Yjs WebSocket server should store in the DB, S3, or API. There are multiple approaches, each with its own trade-offs.
The simplest and most straightforward option is to store a copy of the Yjs state. This can be done in two ways:
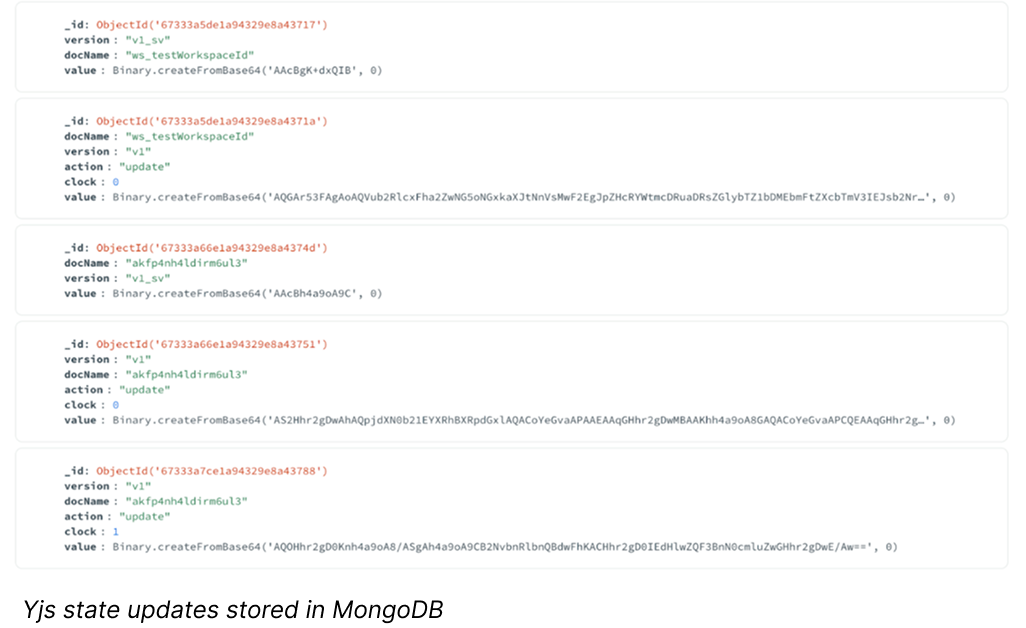
We can encode the entire Yjs state into a single state update. That's what Hocuspocus does in its database extension. Under the hood, it's a result of calling Yjs' function encodeStateAsUpdate. This approach results in a single binary blob—easy to read and write but lacking edit history.
We can save each entry separately. That's the approach used by official Yjs database providers and Y-Sweet. Instead of storing the document as one blob, each update is saved individually, as presented in the screenshot above (stored in MongoDB). It allows access to historical changes but makes the structure harder to read.
- Important Consideration: ‘History’ literally means every single change, and it may grow really quickly. If you choose this method, consider limiting history storage to 100-200 updates, compacting older changes into an initial state.
While these methods are fast and easy to implement, they come with
a drawback—the data is unreadable without Yjs. Although you can use Yjs anywhere (even offline) to decode the data, it may not always be an option
in existing systems.
The second method is to decode the Yjs state and store it as plain
data types:
We can just call toJSON() on specific Yjs' data structures and store the result directly in any database.
Or, after calling toJSON(), we may map the data on the Yjs WebSocket server level to the proper form.
This method requires more work and may be slower, but it provides more flexibility for existing systems. However, when fetching data to recreate a Y.Doc, you must properly reconstruct all Yjs' data structures, as the information about them is lost.
How often?
When it comes to persisting Yjs data in a multi-user real-time collaboration software, timing is critical. The environment is highly dynamic, and even
one user can make multiple changes per second.
With traditional applications, this is usually not an issue. Many systems rely on a Save button or debounce/throttle mechanisms for auto-saving. Changes are either batched and saved periodically, or saved when the user explicitly submits them.
Here, you should think of Yjs as your main state management solution,
not just some communication layer.
In a multi-user real-time collaboration environment, things get more complicated. Why? First of all, debouncing or throttling changes is not
a viable option. Users need to see changes in real-time without waiting
for delayed updates. Also, it can introduce consistency issues and potentially lead to conflicts—which may not always resolve in the way the user expects (we'll explore this in more detail later).
Auto-save on change submit would also be tricky. Since in multi-user editing, changes must be synchronized in real-time, saving only part of the data could create problems. For example, if one user finishes their edits,
but another is still actively working, should we wait until everyone finishes before saving?
To summarize, I've seen two approaches in Yjs providers:
Yjs WebSocket server saves all changes – Every change made by users is persisted immediately in the order that the server receives them. That's what I've seen in official database providers.
Save is debounced or throttled – This is the approach used by Hocuspocus, where data is persisted by default with a 2-second debounce and a 10-second throttle. The server waits for 2 seconds after the last change before saving. However, to ensure that data is not left behind, the server also saves the state every 10 seconds, regardless of whether there have been changes.
For most databases and storage systems, the debounce/throttle method is generally more cost-effective. It minimizes storage usage. However, it does mean that data outside Yjs will always be slightly outdated. This might not be suitable for every system, especially if the backend needs instant access to modified data.
Thinking in Yjs vs client-server thinking
As I mentioned earlier, Yjs operates on a peer-to-peer communication model. This means that even in a client-server architecture, the server is essentially just another client. This can create some unique challenges if you're not familiar with how Yjs works. You might be surprised to hear that "Yjs can't do this," but in reality, it's not that it can't—it's just that it works differently. Understanding how Yjs operates, and how to implement real-time collaboration using Yjs, can help you achieve the results you need.
Key differences between client-server thinking and Yjs
Let’s walk through some of the major differences between typical client-server logic and how Yjs works.
Server can validate data and return an error
- In Yjs, there's no validation. The server is just another client, or you can think of it as a communication bus between the clients. Every change is saved in the Y.Doc and automatically propagated to all other clients.
Server can decide what to save
- In Yjs, to maintain consistency between all clients, every client needs to have the same update history. That means the server can't reject updates—doing so would create an inconsistency, making the Yjs CRDT non-deterministic.
Server can modify data before saving
- When receiving a change from a client, the server shouldn't modify it before propagating it to other clients for the same reasons as above. However, since the server is just another client, it can create a new change that modifies the value. The original value, though, will still be accessible in the history for all clients.
Server can provide sophisticated authorization and access roles on a specific resource level
- Since everyone connected to the particular Yjs document receives all updates, authorization is more limited. You can only control access at the document level, meaning that everyone can see everything within the document. However, you can implement read-only access for specific clients if needed.
Client synchronizes to what the server has
- In Yjs, communication is peer-to-peer. The server is just another client, so the server actually synchronizes to the state that the clients have.
Client-state vs. server-state
- When working with Yjs, you should always think of it as a client state, as using Yjs is more similar to how one uses Redux than TanStack Query.
Let's expand on these differences to better understand how to effectively work with Yjs when building multi-user real-time collaboration software.
How to work with Yjs when building a multi-user real-time collaboration app?
While this article provides an overview, I can't possibly cover every detailed case you might encounter when working with Yjs. However, besides discussing the potential challenges, I’d like to offer some valuable advice:
Learn how exactly Yjs works: While official Yjs documentation isn't very wordy at the time of writing this article, there are plenty of other resources out there. I've already mentioned CRDT.tech that describes CRDTs in a more scientific way. The Yjs Community is a great place to see what kinds of issues other developers are facing and how they’re solving them. If you want to dive even deeper, I recommend reading the Yjs Internals document.
Understand the limitations of Yjs: It's important to understand how Yjs CRDT works and how data is synchronized. But it’s even more crucial to grasp Yjs limitations from a business perspective.
Educate other developers in your project: Once you’ve familiarized yourself with Yjs, don’t keep the knowledge to yourself. Educate your fellow developers—especially those on your project, who are building multi-user real-time collaboration software with you. It can be tough to break out of the traditional client-server mindset (since many of us are used to that model), but it’s entirely possible to shift your team’s approach with the right guidance.
Avoid hacking Yjs: One of the biggest risks when learning Yjs is the temptation to hack it to fit the way you want it to work. This is a dangerous path, as it could lead to non-deterministic state resolution. Instead of trying to force Yjs into your preconceived solutions, take the time to understand its design and work with it in the way it was intended to be used.
Assess if Yjs is right for your project: Sometimes you need to have the courage to say: “Yjs isn't for us.” If your requirements are highly specific, investing time in building a custom solution might be a better option than trying to hack a ready-made one.
Despite the last point, let’s not get discouraged. Stick with me—there’s still more to uncover in the Yjs world!
Conflict resolution in Yjs CRDT
One of the most important aspects to understand when working with Yjs is how conflict resolution works within the Yjs CRDT framework. While it may not always seem critical for developers, especially since things "just work" on the technical side, this knowledge is essential from a business perspective.
How conflict resolution works in Yjs CRDT?
I won’t dive into all the nitty-gritty algorithmic details of conflict resolution
in Yjs CRDT, but let’s walk through a high-level overview.
When a client makes a change, it communicates that change to other clients by sending information about the change itself (insert or remove; modification is a combination of both) along with a Lamport timestamp.
It consists of the operation number and the client ID. In a perfect world, every operation would have a unique and sequential number (like 1, 2, 3, etc.).
However, in distributed systems, operations can arrive out of order,
and sometimes two operations might have the same number because
the system clocks weren’t perfectly synchronized. This can create conflicts.
As you probably remember, Yjs CRDT operates on the client level, and there's no central server to decide the ultimate result of the state. That's why
all computations have to be deterministic, ensuring that all clients
end up with the same result from the same set of state updates.
When resolving conflicts, the first thing that Yjs looks at is the operation's origin and originRight. This defines the user’s intention—for example, whether a new letter in a document was added to the left or right of an already existing character. In cases where two clients perform simultaneous changes in the same spot, the origin helps Yjs CRDT resolve the conflict. If the origins differ, Yjs can place both items in the correct spot, preserving the intention behind each change.
But what if the origins are the same? Some might assume that the latest change should win. However, this approach requires knowing the exact real time (wall clock) of each client, which is most likely desynchronized. To avoid this issue, Yjs adopts a simple yet effective heuristic: the client with the lower ID wins. It may sound odd at first, but this is the easiest approach, and
it ensures deterministic behavior without relying on uncertain factors like
wall clock time.
Example of conflict solving in collaborative diagramming apps
The conflict
Let’s dive into a real-world conflict scenario you might encounter while building collaborative diagramming apps using ReactFlow with Yjs. In this case, we aren’t dealing with simple inserting (like to the left or to the right), but rather working with nodes and edges that are stored in structures like Y.Map or YKeyValue. For simplicity’s sake, imagine that each Yjs structure contains a plain JavaScript object with node or edge data.
Consider the following example. We have a node with three properties: color, caption, and position. Three users simultaneously want to modify it: the first changes the color, the second changes the caption, and the third moves
the node to another place.
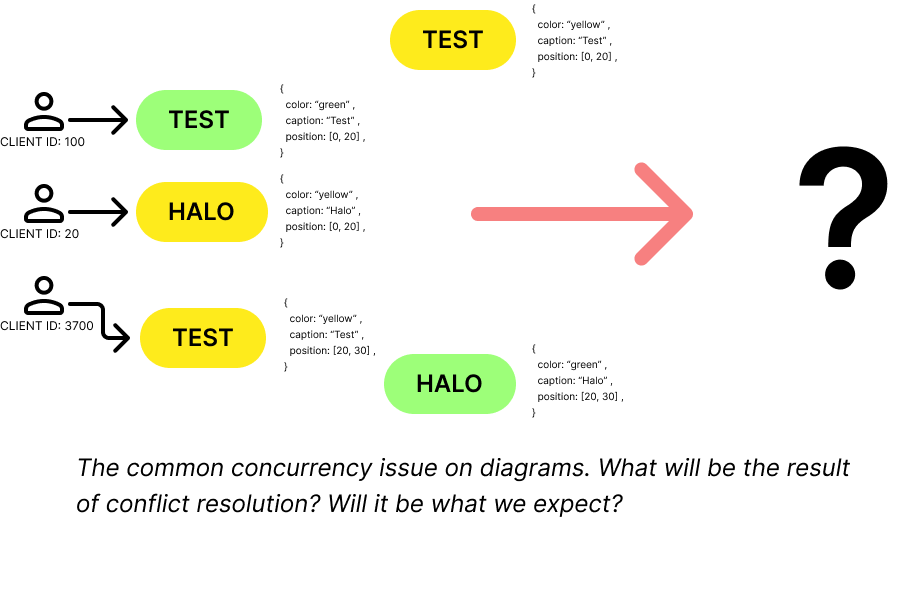
As common logic would suggest, these are three separate changes, so all of them should be performed. However, the result is the following:
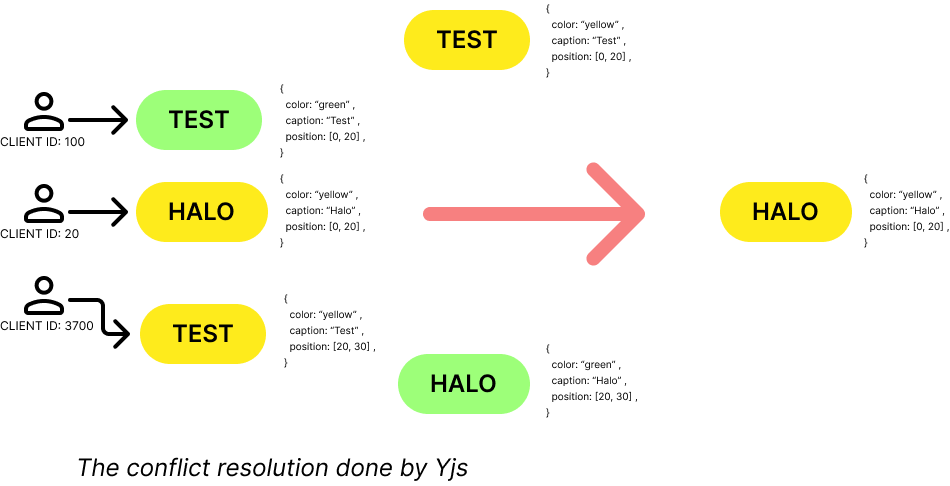
What the ... ?
At first glance, it might seem completely illogical that only the caption change was accepted. But let’s break it down by recalling two key points:
The client with the lowest ID wins (in this case, the client with ID 20 made the caption change).
Y.Map stores plain JavaScript objects.
Yjs performs conflict resolution at the structure level. If we had a key-value map of color, caption, and position, there would be no problem at all. However, the node data itself is treated as a value. Yjs doesn't care what's inside it, so in case of a simultaneous edit, it won't merge the object—it will just replace it.
To prevent such cases, we have two potential solutions:
Lock diagram objects: When a user is editing a node or edge, we know about it because they’ve selected it first. That's the perfect moment to lock editing of the object so other users can't make conflicting changes. This works well in most use cases and is easy to implement, but it depends on having a synchronized state. If one user goes offline, it won’t work.
Keep Yjs structure instead of plain object: Instead of storing objects as they are defined in ReactFlow, we can store them as Yjs data structures. However, this method introduces additional complexity, requiring extra data conversion and could impact client-side performance due to memory overhead.
Yjs integration into an existing system
When integrating Yjs into an existing system, one of the biggest challenges
is managing how it interacts with existing data, and how the rest of the system can access the data we work on in a multi-user collaborative environment.
So, let's start with accessing existing data. The question is: should this data be stored within Yjs, or should it remain outside of it?
Here’s how to decide:
If you’re editing the data and need it to be synchronized in real-time in a multi-user collaborative environment, and don't need to return it to the original API, store it in Yjs.
If the data is extra context and doesn’t need to be synchronized in real-time, don't store it in Yjs.
If the data is only for a particular user and can't be accessed by others, absolutely don't store it in Yjs.
If you're editing the data and need to save it in a REST right away, and at the same time, notify others about the change, it depends. I wouldn't store the data in Yjs in this case, but you can use it to store the timestamp that will force other users to refetch data from the API. However, it's better to use a dedicated notification solution and not pollute Yjs with such data.
One simple rule to follow: In Yjs, store only the data that: a) needs
to be synchronized across all users, b) should be affected by Yjs' conflict resolution, and c) everyone can access.
When it comes to accessing Yjs data externally, most of the cases were covered in our discussion on persistence. However, in some situations, you might want to access the current state of the data as it is now, not the possibly outdated copy. To do this, keep in mind that the Yjs WebSocket server can have HTTP endpoints. If you're using Hocuspocus, you can easily add an endpoint that returns the content of the document. For more specific scenarios, like needing to react to certain events on the Yjs WebSocket server, you may use a webhook extension.
Multi-document approach
A popular use-case for advanced apps is having the ability to edit multiple documents simultaneously within a single view. If you're a developer, you’ve likely experienced this in your IDE—editing two files side by side. If you’re not, think of separate sheets in Excel or different pages in Figma. While these may appear as independent documents, they often share data and interact
in meaningful ways.
For example, imagine a collaborative diagramming app where you maintain
a library of nodes. If a node’s metadata is modified in one diagram, that change should reflect across all instances—just like Figma components
or referencing data from another sheet in Excel.
So, how should you handle this? There are two main approaches, each with its own pros and cons:
Keeping each subdocument as a separate Yjs document
- Every document utilizes a separate WebSocket connection.
a. It's possible to override the Yjs WebSocket provider to reuse the connection, but it comes with drawbacks.
b. Handling multiple connections requires more front-end work to ensure that everything's handled correctly.
- They have separate change histories.
a. However, a common undo-redo management is possible using YMultiDocUndoManager.
- This approach allows lazy-loading and subdocument-level authorization.
- Most probably, you'll need an additional document for shared data.
- Subdocuments can be kept in other documents (see: https://docs.yjs.dev/api/subdocuments), however, it may not be supported by connection providers (e.g. currently Hocuspocus doesn't support it).
Keeping everything in one Yjs document
- Only one WebSocket connection is utilized.
- Common change history.
- It's not possible to lazy-load data or do more precise authorization.
- The structure is much simpler and allows more flexibility.
At first glance, using separate documents may seem like the better solution, but both are correct, and the right choice depends on your needs. It’s essentially a trade-off between simplicity and fine-grained control. Choose wisely!
Using Yjs with front-end frameworks
The last thing I’d like to discuss is how to use Yjs with front-end frameworks. As you’ve seen earlier, Yjs data structures follow the observer design pattern, meaning they notify us about every change—allowing full control over data updates. There are two options for what we can do:
Use Yjs directly: Each component using Yjs creates its own observers.
- This is the approach demonstrated earlier in the React example.
- Despite using observers, to achieve reactivity, front-end frameworks need to be explicitly notified about changes, which means copying data from Yjs into the reactive local state—introducing extra complexity.
- Another layer of complexity is added on the developer’s end, as they need to remember about proper garbage collection. Every time a component is destroyed, you have to remember to unsubscribe from Yjs.
Use a global state management library as a middle layer: Instead of creating observers on the component level, you create one that updates data in a store like Redux or Zustand.
- It's an additional layer, meaning higher memory usage. But remember that in the previous case we also had to copy data from Yjs.
- It breaks the principle I've described before about using Yjs as a state management solution. However, as long as you update everything directly in Yjs and not manually in the middle layer, you’re fine.
- Responsibility for reactivity is moved completely to the state management library. Their bindings offer optimized ways to notify components about changes (like useSyncExternalStore in React) that don't require utilizing local state.
a. Of course, you may try to use things like useSyncExternalStore with Yjs.
- You need to remember about garbage collection only in the place where you're syncing the store, not in every component.
I haven’t conducted formal benchmarks, but based on my experience, the second approach (using a global state library) tends to perform better. But don't quote me on that, I don't have hard proof to support it. A more fine-grained integration with useSyncExternalStore could potentially work even better—something I haven’t personally tested yet.
Summary: Considering everything—is Yjs even right for me?
Let's end this long journey through multi-user real-time collaboration software with a simple, yet fundamental question: Is Yjs even the right choice for my collaborative diagramming project?By now, you probably have an idea of where Yjs shines, where it adds complexity, and where it might not be the best fit. But to wrap things up, let’s summarize the key considerations.
Comparison by functions
Throughout our journey, I tried to describe how Yjs works and what limitations it poses, especially when we compare it to traditional client-server solutions. Here’s a short summary:
Synchronization of simultaneous edits on the same document: That's generally the main purpose of Yjs.
Server doesn't need to accept changes: For example, by performing a validation. That's something that Yjs can't do, as the state always gets synchronized between all clients.nstead of creating observers on the component level, you create one that updates data in a store like Redux or Zustand.
No custom rules for conflict resolution: If you don't need to interfere with Yjs' default way of conflict resolution, it's perfectly fine for you. When you need custom rules, maybe you need another solution.
Simple authorization: If you don't need fine-grained control over access to resources, Yjs will be enough. In Yjs, authorization can be done only on the entire document level, as every client needs to have all the changes for proper state synchronization.
- Keep in mind that you can utilize multiple documents for more control over access.
Full changes history: Yjs just provides it. But remember that everyone who has access to the document also has access to all changes.
What I haven't written explicitly yet:
Real-time synchronization of components dependent on each other: As Yjs gives great conflict resolution, it's ideal for scenarios when edits from one user impact another user’s workflow.
- However, when all components are independent of each other, Yjs might be an overkill. Something simpler, without sophisticated conflict resolution, may be enough.
Real-time synchronization all-to-all: As Yjs works in a peer-to-peer manner, it’s perfect when everyone has the same editing permissions.
- When there's only one editor and the rest can stand by and watch the changes; or more generally speaking—you're solely streaming read-only data (e.g. readings from sensors), you might be better off with a simpler solution. Conflict resolution and changes history are not necessary in such use cases. Don't treat Yjs as a generic real-time data provider.
Comparison by app type
While Yjs excels at handling multi-user real-time collaboration, not every app benefits from its unique strengths. Let’s break it down by going through examples of apps where Yjs is the perfect fit and where a simpler solution might be better.
In general, Yjs is designed for collaborative document editing. Think of apps like Google Docs, Notion, Miro, Figma*, Excalidraw. If your app is similar,
Yjs is for you.
Yjs isn’t a one-size-fits-all solution. Here are examples when it’s not the best choice:
Showing real-time data: e.g. stock quotes, live sports commentary.
- In such cases, there’s no need for conflict resolution—data is simply broadcasted from the server to clients in real-time, which can be achieved with simpler means.
- Bonus tip: If you need to provide in-app notifications, but you aren't limited to having Yjs in your system, it's best to use a separate provider for those notifications.
Real-time messaging: e.g. chats, comment systems, social media.
- Despite the fact that multiple users post simultaneously, in the same system, basically in the same document, the reality is that providing conflict resolution is not necessary. Again, simpler solutions are available.
Multi-player games
- In games, you don't particularly need the history of changes, and since everyone controls a different player, conflict resolution is also unnecessary.
- In this case, it's also worth noting that it may be beneficial to give a server more control over communication to prevent cheating. As we learned, in Yjs, we can't modify the content of synchronized data.
* Figma developers may disagree with me, as they don't use CRDT, but their own solution inspired by CRDT and OT (Operational Transforms). However, it doesn't mean that it won't work in your case. If you’re curious, I highly recommend reading Figma’s case study on their approach to multi-user real-time collaboration.
It’s a wrap!
Congratulations—you’ve made it to the end!
As you’ve seen, multi-user real-time collaboration is a vast and complex topic. And believe me—we’ve only scratched the surface!
I hope this guide has given you a clearer understanding of multi-user real-time collaboration, and Yjs, in particular—where it shines, where it has limitations, and whether it’s the right fit for your project. With the insights shared in this article, you're better equipped to create successful and
high-performing collaborative diagramming apps. Next step is learning
how to optimize your ReactFlow project performance.
And if you’d like to learn more about how diagrams can benefit your business, don't hesitate to reach out to us at Synergy Codes. With our data visualization expertise, we’re ready to support you in building multi-user
real-time collaboration apps in ReactFlow using Yjs, bringing your vision
to life with the assistance of our top-tier developers.